YOUR 1975 MIDGET / WORKSHOP
Open the bonnet.
Know what to do.
Practical jobs for the car in your photographs. Each guide puts the part, the sequence, the final check, and the factory source in one place.
Choose a job Find a part in your photos ↗Plan a project ↗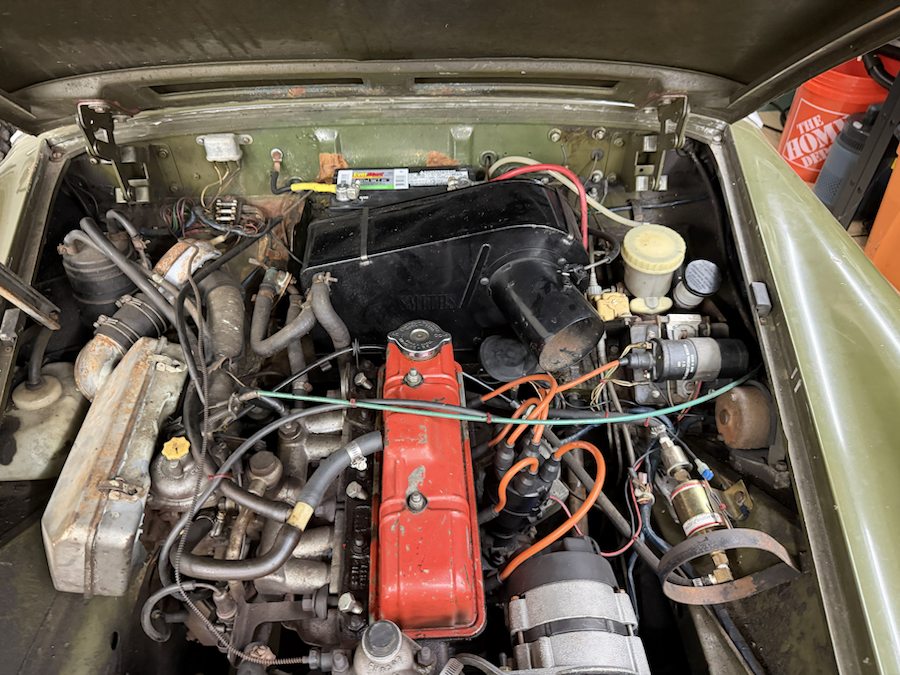 YOUR ENGINE BAY · IMG_6856
This is a North American 1975 Midget 1500 guide. The factory specification identifies a single Zenith-Stromberg 150 CD4 carburetor. The photographed car has a red rocker cover, black air cleaner, and orange ignition leads. The exact engine and emissions variant still needs confirmation from its identification plates. The manual’s UK twin-carb pages do not describe this intake setup.
Factory US specification, PDF p. 17 ↗What are you working on?
Checkmarks are a dated work session, saved in this browser. Use “Start new run” when repeating a check. An old check does not describe the car’s condition today.
Find it in the bay.
Tap a numbered marker to jump to a guide. This photo fixes the visible positions; the dipstick and sump drain remain unmarked; the blue cartridge in the ignition close-up is a probable filter that needs direct confirmation.
- 1 · Oil filler capThe black cap at the top of the red rocker cover. The dipstick is a separate handle lower on the engine.
- 2 · Rocker coverRemove this cover only for the valve-clearance job.
- 3 · AlternatorThe silver unit at the lower right of this photograph; the belt is clearer in the close-up below.
Decide what needs attention first
Use this as an evidence log after a long lay-up or unknown service history. Checking a step means you recorded an observation, not that the system passed or the car is roadworthy.
Have ready
Phone or camera · torch · tyre-pressure gauge · notepad or project planner · factory manual. Park level with the key out and engine completely cold. Record date and odometer reading.
For each system: record “observed OK,” “needs work,” or “unknown,” with a photograph or measurement. An unverified system stays unknown.
Brakes, tyres, steering, fuel containment or cooling have known faults or cannot be judged safely. A completed checklist is a record of this inspection; it is not clearance to drive. Get a qualified inspection for systems you cannot verify.
Survey the car first
A one-pass record of the car’s condition before ordering parts or choosing a first drive. The factory 1975–76 US summary calls for weekly checks of fluids, tyres, lights, horn and wipers.
Have ready
Phone or camera · notepad or project planner · torch · tyre-pressure gauge. Work on level ground with the engine off and fully cool.
Record before changing anything: odometer reading, date, identification plates, fluid levels, leak locations, belt condition and any nonstandard parts.
You have dated photos, plate transcriptions, a recorded odometer reading, fluid and tyre observations, and a short list of projects with a clear next action. Unknown service history remains unknown until supported by records or completed work.
Check engine oil
Use the dipstick’s own MIN and MAX marks. The factory US schedule calls for this check weekly.
Have ready
Clean lint-free rag · correct engine oil if top-up is needed · level parking spot.
Find the parts: the oil filler cap is marker 1 above. The dipstick is separate; confirm its location from the factory illustration before pulling a nearby tube or cap.
The level is between the marks and both cap and dipstick are seated. If the level repeatedly falls, find the leak or consumption cause before relying on top-ups.
Change oil & filter
The factory capacity for the sump including filter is approximately 4.5 litres / 9.6 US pints. Use the dipstick as the final fill check, not the nominal capacity alone.
Have ready
Oil matching the factory viscosity chart for your climate · verified replacement spin-on cartridge and seal · drain pan holding more than 4.5 L · suitable drain-plug tool · clean rag · safe means of accessing the sump · disposal container.
Stop point: identify the actual drain plug and filter on your car before loosening anything. IMG_6797 shows a blue cartridge that is probably the filter, but its label and mounting are unreadable. The sump drain is still unmarked. Confirm both on the car before loosening anything.
The filter and plug are dry, the oil level is correct after settling, and used oil and filter are ready for proper recycling. Recheck for leaks after the next drive.
Check the fan belt
At the midpoint of the longest run, the manual calls for about ¾ in / 19 mm total movement under moderate finger pressure.
Have ready
Ruler · appropriate wrenches for the fitted alternator brackets · light source. Engine off and cool; keep fingers clear of the fan.
The belt is undamaged, the measured movement is about 19 mm, and the alternator is secure. Do not overtighten: excessive tension loads the water-pump and alternator bearings.
Set valve clearances
The factory cold clearance is 0.010 in / 0.25 mm. Count valves from the front of the engine and use the pair sequence below.
Have ready
0.010 in feeler gauge · wrenches for rocker-cover nuts and adjuster locknuts · screwdriver for the adjusters · means of turning the engine by hand · replacement rocker-cover gasket if needed.
Before removing the cover: record where the ignition leads and hoses run in your own photos. Turn the engine only by a safe manual method, with the ignition disabled and transmission in neutral; keep clear of moving belts and fan.
Each valve measures 0.010 in cold after its locknut is tightened, the cover seal sits evenly, and no oil leaks appear after running the engine.
Inspect the cooling system
Use your close-up to find the expansion tank, radiator, hoses and fan. The 1975–76 US factory schedule lists a weekly coolant check and periodic cooling-system inspection.
Have ready
Phone or camera · torch · clean rag · project planner. Park level, switch off, remove the key and let the engine cool fully. Never open a hot pressure cap or put hands near a fan when the engine can run.
Scope: this is a visual condition check. Do not add coolant, loosen a hose or remove a cap until you have identified the fitted system and its correct filling procedure.
You have dated photos and a written observation for the tank, radiator, hoses, fan, belt and ground beneath the car. A visually dry system does not prove it will hold pressure; suspected leaks need the correct repair and a proper pressure check.
Next measurements that would improve these guides
A straight-on photograph of the engine number, dipstick, readable filter label and sump drain would turn the remaining “locate and verify” steps into exact points on your car. The current photo scale already anchors the rocker-cover footprint in the engine CAD study.